How To Get the NEW Facebook TimeLine Profile
How To Get the NEW
Facebook "TimeLine" Profile
You have probably heard about Facebook’s New "Timeline" Profile that will be launched in the near future. Maybe you also heard that some folks (like your's truly (-;) have somehow gotten a Sneek Peek at this new Feature, and even have it installed on their FB Profile, even though it hasn’t been launched yet ... you want to get it for yourself???
Here is how you can set it up now too! First you might want to take a look at this screen shot of my FB Time-Line Enabled Profile so you can get an idea of what this is all about. (I'd send you to my FB profile to see it live, but TL profiles are only visible to registered members of the FB Dev group at this time, oh! but if you follow the steps below you'll be part of that too!)
Just like the "New Twitter" full launch this summer, eventually the Facebook Timeline will be forced onto all members ... so regardless if you love it or hate it ... it is coming sooner or later to a FB-profile near you! So why not get ahead of the curve, avoid the rush, and get the TimeLine profile installed now. You will have to play in the Developer Group’s area of Facebook's site, but that is not big deal, no real "programming" involved - just type a couple words and some clicks - and I'll guide you through it!
How To Get the Facebook Timeline:
Step 1 - DON'T FREAK OUT! This really is easy, and you are not really creating much of an app, and no one else will ever see it or use it. Now then, of course you need to login to Facebook! Follow this link to the Facebook Developer Group . If you have never been to this page click "Allow” so the page can access your basic FB information. https://developers.facebook.com/apps
Step 2 - Once you are into the Developer Group, click on the “Create New App” button. If you previously have clicked 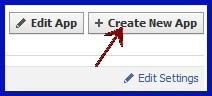 into the Dev Group and already have an App associated with your account you can either create a new app or go to Step 4 and use the existing App by clicking the “Edit App” button.
Step 3 - In the pop-up window you will name your new app. It doesn’t really 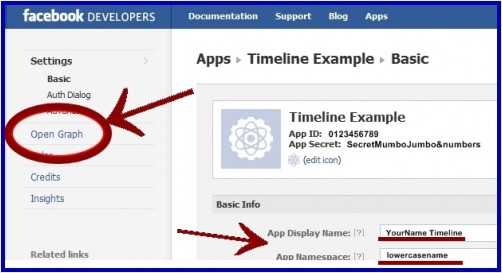 matter what you call it, just choose a name for the “App Display Name” - Like YourNameTimeLine, and then a "lowercase name" for the “App Namespace” box. Check box that you agree to the FB Privacy policy and then click on the “Continue” button.
Step 4 - Fill out the "Captcha" box to prove you are a human being and not a robot. That takes you to your App Settings page. Now click on the “Open Graph” tab on the lefthand column menu.
Step 5 - On the Open Graph settings page click the “Getting 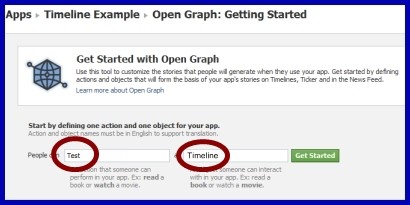 Started" link on the menu under "Open Graph”. The "Get Started with Open Graph" will open. In this section you will need to define “one action" and "one object for your app.” Once again, it really doesn’t matter what you type into this section. Go for simple! My example is "Test" & "Timeline". Type in something and then click the green “Get Started” button.
Step 6 - Don’t make any changes at all on the next page you are taken to. None of the settings need to be messed with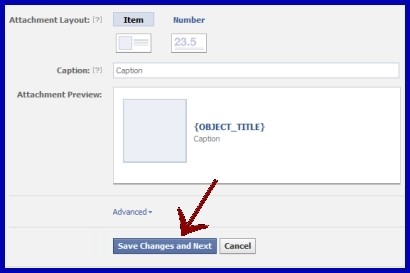 for this thing to work! Just scroll all the way to the bottom of the page and click the “Save Changes and Next” button to continue.
Step 7 - You will be taken back to the "Open Graph" settings page. Wait a couple 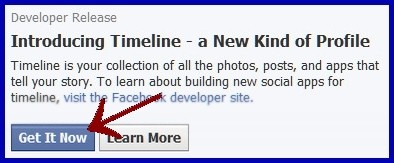 minutes for FB to save everything. Then go to your Facebook homepage/profile to check for status updates. Within one or two minutes refresh/reload your homepage and you see your invitation to the "Developer Release" of Timeline. Click “Get it Now”!!!
Now you got your NEW Timeline Profile!